How to Insert a Picture in Microsoft Word
Microsoft Word 2007, 2010, 2013, and 2016
Introduction

Images are a great way to liven up a document, and Word offers a few methods to insert them. There are built-in clip art images for just about every topic, so you may be able to find a perfect clip art image for your document. If you have a more specific image in mind, you can insert a picture from a file.
In this lesson, you will learn how to insert an image from a file, and how to change the text wrapping settings for your images.
What is Microsoft Word?
Microsoft Word or MS-WORD (often called Word) is a graphical word processing program that users can type with. It is made by the computer company Microsoft. Its purpose is to allow users to type and save documents.
How to Insert a Picture from a File?
- Place your insertion point where you want the image to appear.
- Select the Insert Menu
- Click the Picture command in the Illustrations group. The Insert Picture dialog box appears.


- Select the desired image file, then click Insert to add it to your document.
 |
- Picture Inserted Successfully

💗 To resize an image, click and drag one of the corner sizing handles. The image will change size while keeping the same proportions. If you want to stretch it horizontally or vertically, you can use the side sizing handles.
How to Changing text wrapping settings
When you insert clip art or a picture from a file, you may notice that it's difficult to move it exactly where you want. This is because the text wrapping for the image is set to In Line with Text. You'll need to change the text wrapping setting if you want to move the image freely, or if you just want the text to wrap around the image in a more natural way.
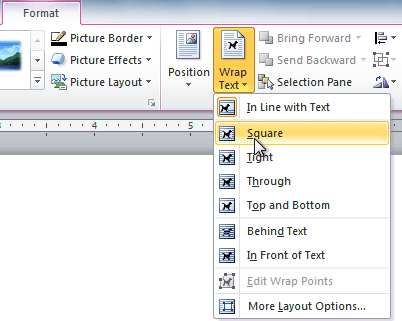
To wrap text around an image:
- Select the image. The Format tab will appear.
- Click the Format tab.
- Click the Wrap Text command in the Arrange group.
- Select the desired menu option. The text will adjust based on the option you have selected.
- Move the image around to see how the text wraps for each setting.
💗 If you can’t get your text to wrap the way you want, click the Wrap Text command, then select More Layout Options from the menu. You can make more precise changes in the Advanced Layout dialog box that appears.
To use a predefined text wrapping setting:
- Click the Position command to the left of the Wrap Text command. A drop-down menu will appear.
- From the drop-down menu, select the desired image position.

- The image will move to the position you have selected, and it will automatically have text wrapping applied to it.
Thanks to Visiting my Blog
Please share your opinion about this helpful article
in the comment box.
More Helpful Articles:


No comments:
Post a Comment